Stop Being Lazy and Learn How to Edit Your Photos
Learning how to photo edit really isn’t that hard.
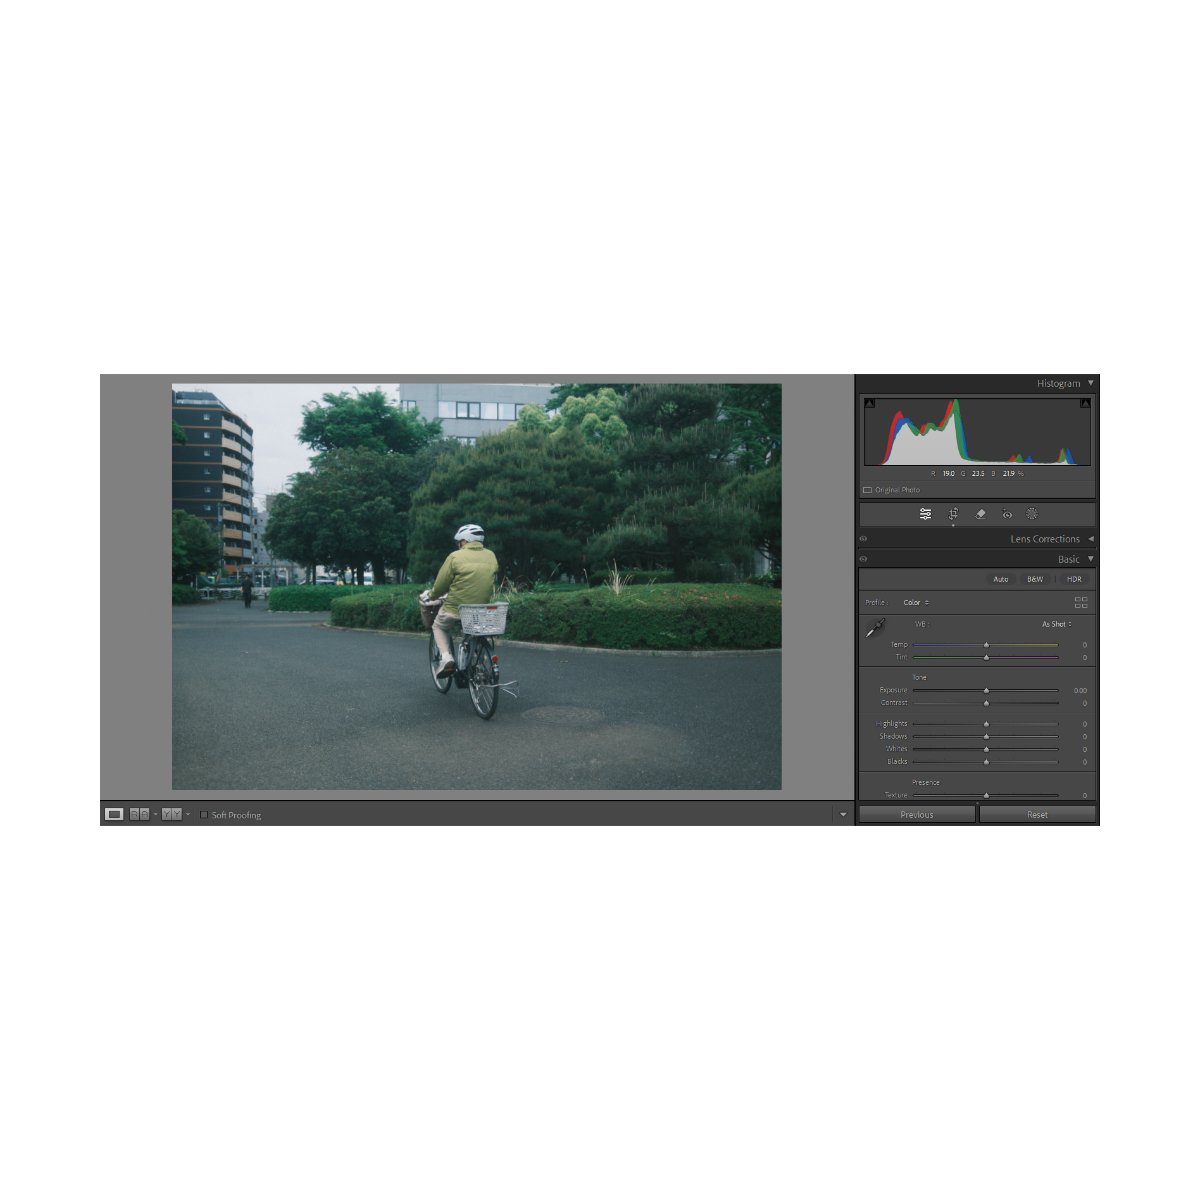
It just seems scary at first when you open a program like Lightroom or Capture One and you don’t recognize any of the controls.
Which might lead you to look for an easy solution, like presets, which are typically a poor investment.
Because although they can work, they don’t work for everything, and they don’t teach you what you’re doing.
That’s why, if you hop on any social media app, you’ll often see comments asking:
“How did you make your photo look like that?”
“What presets did you use?”
“Settings, please!”
People don’t know how to reverse engineer a look from someone else’s photo because they don’t know how to edit in the first place.

So even if you have gotten good mileage out of presets, eventually there comes a point when you have to learn what you’re doing to use them well.
Which, if you’re gonna go that far, you might as well learn how to edit, so you can make your own.
And once you start putting in the time, it’s not as bad as it seems.
It’s just, many photographers are lazy.
They don’t want to take the time to learn photo editing, which is half of photography.
And they end up with an ever-expanding archive of thousands of photos never fully processed, just taking up space on their hard drives.
But what if I told you there’s actually an easy way to learn how to photo edit, that doesn’t require hours sitting through textbooks or frustration trying to perfect every single detail?
Today I’ll share this with you which will hopefully help you finally learn how to edit.
Let’s begin.

Step 1: Get Used to the Interface
Learning how to photo edit can be simple.
The first step is to get used to the interface.
Like any other program, Lightroom has a bunch of unfamiliar buttons and tools, so simply understanding what you’re looking at comes first, and then it gets easier from there.
It’s honestly like switching systems between iOS and Android, or Mac and Windows.
Or driving a different car for the first time.
At first it’s really weird.
But over time you get used to the interface and what does what.
And eventually, you stop thinking about it all together.
Learning Lightroom or Capture One is the same exact thing.
If you’re just getting started, it’ll take some effort and a lot of googling.
But that’s just how it is in the beginning.
Eventually you’ll become quite proficient and know where everything is.
You just need to get over that hump, and not quit early simply because you’re looking at a foreign language.
Stick with it.
Personally, what I’ve found most useful when it comes to learning programs or interfaces is to learn through tasks, not time.
Instead of saying “I’m going to spend an hour studying Lightroom and photo editing today”, which never works, give yourself an assignment.
It could be “edit 100 photos a day” or “copy X photographer’s photo edit”.
For me, I prefer the first, it keeps things simple and I can still experiment along the way.

As people, we learn best through application and active recall.
If we’re doing something a lot and need to remember how to do it, we’re less likely to forget it.
But if it’s some niche math equation from high school that we never use anymore, we’re not gonna remember it.
If you don’t use it, you lose it, right?
Inversely, if you keep using it, you’ll remember it.
Furthermore, giving yourself a task forces you to learn the necessary tools to complete that task.
It serves as a razor for what’s important and not important.
In Lightroom there are dozens of tools we can use to edit our photo with, but not all of them are necessary.
So some people get caught in the trap of learning all these fancy tools that they will rarely ever use.
However, learning as we go, is actually appropriate for something like photo editing, because it’ll save us so much time.
If there’s a tool or something we need, we’ll figure it out then.
We don’t need to be masters of Lightroom - we just need to learn what we need to do the things we want.
So giving yourself an assignment like “edit 100 photos” can teach you photo editing within a short span of time.
Because you literally can’t complete that assignment if you don’t know how to edit.
To do this task you’ll probably have to google a bunch of stuff and learn of bunch of things.
Which means the first 10 edits might take a while.
But by the time you’re on your last 10 edits, you’ll have a pretty good sense of what you’re doing.
And it’ll take you less time to edit those last fifty than it did for you to edit those first ten.
You’ll also be much more comfortable with the interface, you’ll know where the things you need are, and you can forget about the rest.
It’s better to be proficient in the few tools you use 90% of the time, than widespread amongst a bunch of stuff you never use.
So that’s step 1 - getting used to the interface.
Let’s move on to step 2.

Step 2: Use Widespread Adjustments
Have you ever watched photography content online of someone masking a certain image, showing the before and after, and then everyone in the comment section goes crazy?
That kind of content has been doing pretty well lately.
But what if I told you that 99% of your images won’t need that level of detail?
You see, within Lightroom or Capture One, the most important tools are your very basic ones.
Things like split toning, and even color curves and color wheels aren’t necessary for most people.
Because although they can be very powerful, they can also be quite situational.
Meaning if you use them wrong, or for an image that doesn’t need it, it can make your edit worse, not better.
Furthermore it can be quite time consuming to edit to that level of detail every single time.
So although it can get a lot of traction on social media, functionally, not every photo needs every single tool.
And like many things, for photo editing, less is more.

In fact, I’ve saved a lot of time and gotten a lot better at photo editing simply by focusing on “widespread adjustments”.
What do I mean by this?
I mean that photo editing has components to it: the 20% that accounts for 80% of the edit, and the 80% that accounts for 20% of the edit.
This 20% that does the heavy lifting is the part we should get really good at and also give more attention to.
These things impact the image more and take less time to do, so it’s better to focus on them than doing an adjustment no one will notice.

What are these components you might ask?
Well, you’re probably already familiar with them.
Things like your basic sliders, tone curves, straightening tools, and even elementary color adjustments.
They’re not fancy or complicated, but they affect most of your image, and therefore should be considered more important.
If you want a basic breakdown of all the basic tools I use, which I’d consider fundamental to photo editing, we cover all of that in Photography Essentials - check it out, it’s free.

So personally, I spend most of my time getting those right.
The photo edit as a whole looks better, sliders are easy to understand, and I can edit much faster that way.
It’s a waste of time spending all this energy masking or tinting 1% of the photo no one is going to notice.
But once you get really good at widespread adjustments, it’ll show in your photos.
Of course there are certain photos, the five star photos or print worthy ones, where we want to go to that extra level of detail to make it perfect.
But for 99% of your photos, it’s not necessary.
Try editing with this philosophy in mind, I think you’ll find editing much less of a drag.

Step 3: Edit In A Lazy Way
Once you’ve understood the interface of the program you’re using and have learned to edit simply with widespread adjustments, you pretty much have all the tools you need.
Photo editing really doesn’t get much more complicated than that.
From here on out it comes down to figuring out the workflow that best suits your goals and the end result you want.

If you’re just taking photos of your family and friends you might not need the best photo edits, or maybe you don’t need to edit to begin with.
If you want to make prints and put them up or sell them, well, you might have to go the extra mile for that.
The better the outcome you want, the more effort and patience is required - that’s unavoidable.
But if you find yourself stuck being lazy, understand that you don’t have to “fix that laziness” first.
In fact, if you’re lazy, you can simply...edit in a lazy way.
Many of us get caught up in excuses of laziness, or high standards, or whatever.
It’s all bullshit.
On one side we have people who complain that “it’s too complicated”.
On the other side we have people that complain that “they want it to be perfect”.
The first problem we already covered in the first two chapters of this article.
The second just needs some reframing.
If you’re the type of person who is both lazy and perfectionistic, understand it doesn’t have to be that way.
You might say things like “It’s not going to be perfect, so why bother?”
But that kind of thinking just traps you into doing nothing, because you can’t be bothered to put in the effort to even attempt to make it perfect.

But if perfection is impossible anyways, one the best things we can learn is to just be okay with that.
Tell yourself: “I’m going to edit these photos, it might not be amazing, I’m a bit lazy so I’ll just do the widespread adjustments for now, and whatever, who cares.”
Hence…editing in a “lazy way”.
Because it’s better to have done the work, gone through the folder, and edited those photos lazily - even if they didn’t come out perfect.
These invisible reps, reps that don’t seem like they’re doing much but pay off later, are necessary for our growth.
And you’ll learn so much about photography along the way.
You can’t perfect if you never start, right?

So maybe you’re not lazy, just perfectionistic, and needed to realize that you can still edit your photos regardless.
Or maybe you are lazy and have simply needed to see that photo editing isn’t as complicated or hard as it looks.
Regardless of the reason, I hope this article helped you cross that bridge.
If you have a friend who also struggles with this, and could benefit from reading this article - send this to them.
Again if you want to learn more on the actual basics and tools for photo editing, go to Photography Essentials - it’s free.
If you want to learn all about systems, improving, and getting better at photography, check out Photography Systems.
Thanks for reading and happy shooting.